Contents
I. Introduction
Welcome to the world of culinary knife skills! Whether you’re a seasoned chef or a home cook looking to up your game in the kitchen, mastering knife techniques is essential for precision and safety. In this article, we will explore the fundamental skills and techniques that will elevate your culinary prowess.
Using the right knife and employing proper cutting techniques can make a world of difference in your cooking. Not only will you be able to achieve consistent and professional-looking results, but you’ll also reduce the risk of accidents and injuries.
Throughout this article, we will delve into various knife skills, such as the proper way to hold a knife, different cutting techniques, and the importance of knife maintenance. We will also discuss the types of knives commonly used in the kitchen and their specific purposes.
Whether you’re looking to julienne vegetables, debone a chicken, or finely mince garlic, this article will provide you with the knowledge and skills to tackle any culinary task with confidence. So, let’s sharpen our knives and dive into the exciting world of culinary knife skills!
II. Essential Knife Skills for Precision

When it comes to culinary knife skills, precision is key. Mastering the art of knife handling not only enhances your cooking experience but also ensures safety in the kitchen. In this section, we will explore the essential knife skills that every aspiring chef should learn. From proper grip and hand positioning to knife selection and maintenance, sharpening techniques, and various cutting techniques, we will cover it all.
A. Proper Grip and Hand Positioning
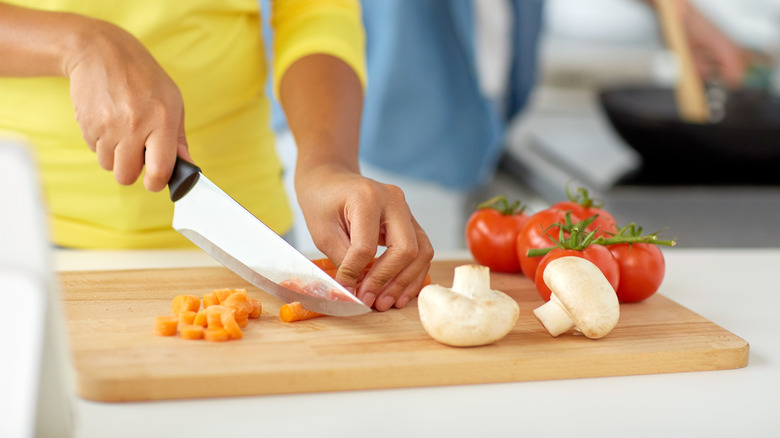
Before diving into the world of knife skills, it is crucial to understand the importance of a proper grip and hand positioning. Holding the knife correctly not only improves control and maneuverability but also minimizes the risk of accidents.
When gripping the knife, place your index finger and thumb on opposite sides of the blade, just above the handle. Wrap your remaining three fingers around the handle, ensuring a firm but comfortable grip. This grip provides stability and control while allowing for smooth and precise cutting motions.
In terms of hand positioning, it is essential to maintain a relaxed and natural posture. Keep your wrist straight and aligned with your forearm, avoiding excessive bending or twisting. This position promotes better control and reduces the strain on your wrist and arm.
B. Knife Selection and Maintenance
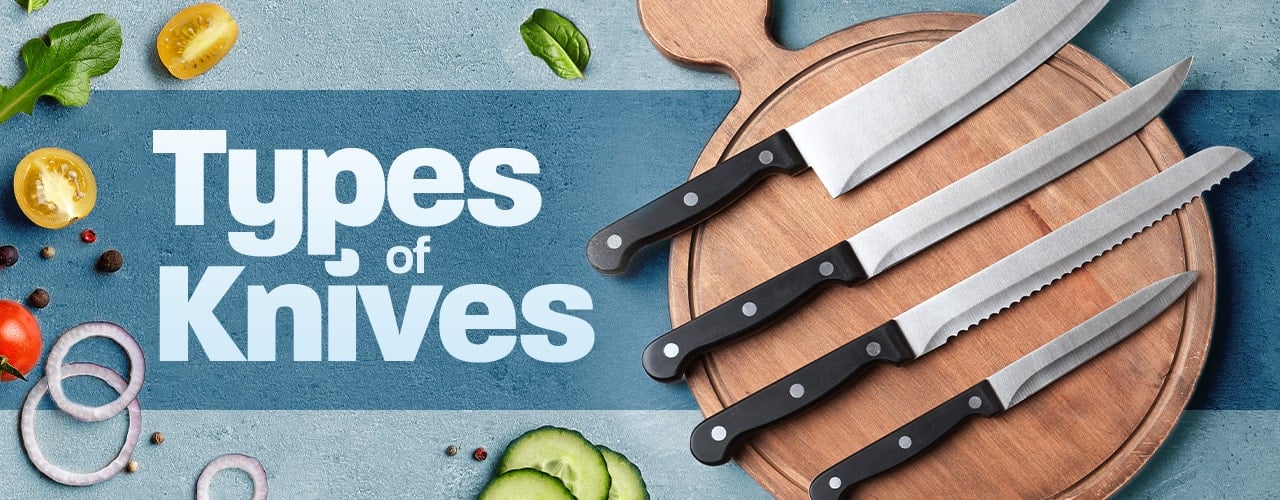
Choosing the right knife for the task at hand is crucial for achieving precision in your cuts. Different knives are designed for specific purposes, such as slicing, dicing, or chopping. Understanding the various types of knives and their uses will greatly enhance your culinary skills.
Investing in high-quality knives is essential for both performance and longevity. Look for knives made from durable materials, such as stainless steel, with a comfortable handle that provides a secure grip. Regular maintenance, including sharpening and honing, is also necessary to keep your knives in optimal condition.
Sharpening your knives regularly ensures that they remain sharp and effective. You can use a sharpening stone or a honing rod to maintain the blade’s edge. Additionally, proper storage, such as using a knife block or magnetic strip, helps protect the blades from damage and ensures easy access.
C. Knife Sharpening Techniques
Knife sharpening is a skill that every chef should master. Dull knives not only make cutting more challenging but also increase the risk of accidents. There are various techniques you can use to sharpen your knives, including:
- Using a sharpening stone: This traditional method involves sliding the blade across a sharpening stone at the correct angle to achieve a sharp edge.
- Using a honing rod: A honing rod helps maintain the knife’s edge between sharpenings. Simply run the blade along the rod at a consistent angle to realign the edge.
- Using a knife sharpener: Electric knife sharpeners are convenient tools that quickly and efficiently sharpen your knives. Follow the manufacturer’s instructions for optimal results.
Regularly sharpening your knives ensures that they remain in top condition, allowing for precise and effortless cutting.
D. Knife Cutting Techniques
Now that you have a solid foundation in grip, hand positioning, knife selection, and maintenance, let’s explore some essential cutting techniques that will elevate your culinary skills.
1. Julienne
Julienne is a technique used to cut food into long, thin strips. It is commonly used for vegetables, such as carrots or bell peppers, and is often seen in stir-fries or salads. To julienne, start by cutting the food into rectangular shapes. Then, slice the rectangles into thin, uniform strips.
2. Brunoise
Brunoise is a fine dice technique used to create small, uniform cubes. This technique is often used for ingredients like onions, carrots, or celery, and is commonly seen in soups, sauces, or garnishes. To brunoise, start by julienning the ingredient. Then, cut the julienned strips into small, even cubes.
3. Chiffonade
Chiffonade is a technique used to cut leafy greens, such as basil or spinach, into thin, ribbon-like strips. This technique is often used for garnishing or adding flavor to dishes. To chiffonade, stack the leaves on top of each other, roll them tightly, and slice across the roll to create thin strips.
4. Mince
Mincing is a technique used to finely chop ingredients into tiny pieces. It is commonly used for garlic, ginger, or herbs and is often seen in sauces, marinades, or dressings. To mince, start by finely chopping the ingredient. Then, use a rocking motion with your knife to further break down the pieces into smaller sizes.
5. Dice
Dicing is a technique used to cut ingredients into small, uniform cubes. It is commonly used for vegetables, such as potatoes or onions, and is often seen in stews, sautés, or salads. To dice, start by cutting the ingredient into rectangular shapes. Then, slice the rectangles into small, even cubes.
Mastering these cutting techniques will not only enhance the visual appeal of your dishes but also ensure even cooking and consistent flavors.
By developing essential knife skills for precision, you will elevate your culinary prowess and create dishes that are not only delicious but also visually stunning. Remember to practice these techniques regularly and always prioritize safety in the kitchen. Happy cooking!
III. Knife Safety Practices
Knife safety is of utmost importance in the culinary world. Whether you’re a professional chef or a home cook, understanding and practicing proper knife safety techniques is essential to prevent accidents and injuries. In this section, we will explore the importance of knife safety, safe handling and storage of knives, knife safety rules, knife safety tips for beginners, and common knife-related injuries and prevention.
A. Importance of Knife Safety
Knife safety is crucial for several reasons. Firstly, it helps prevent accidents and injuries in the kitchen. A sharp knife can cause severe cuts and lacerations if not handled properly. By following proper knife safety practices, you can minimize the risk of accidents and create a safe working environment.
Secondly, knife safety ensures precision and efficiency in your culinary tasks. When you handle a knife with care, you have better control over the blade, allowing you to execute precise cuts. This not only enhances the presentation of your dishes but also improves your overall cooking skills.
Lastly, knife safety promotes longevity and durability of your knives. By using proper cutting techniques and maintaining your knives regularly, you can extend their lifespan and avoid unnecessary wear and tear.
B. Safe Handling and Storage of Knives
Proper handling and storage of knives are essential to prevent accidents and maintain their sharpness. Here are some guidelines to follow:
- Always hold the knife by the handle, ensuring a firm grip.
- Avoid gripping the blade or running your fingers along the cutting edge.
- When passing a knife to someone, place it on a cutting board and let the other person pick it up.
- Store knives in a knife block, magnetic strip, or knife sheath to protect the blade and prevent accidental cuts.
- Keep knives away from the edge of countertops or tables to avoid them from falling off.
- Never leave knives in a sink full of soapy water, as it increases the risk of accidents when reaching into the water.
C. Knife Safety Rules
Following knife safety rules is crucial to ensure your safety and the safety of others in the kitchen. Here are some fundamental knife safety rules to abide by:
- Always keep your knives sharp. Dull knives require more force to cut, increasing the risk of slips and accidents.
- Pay attention and focus on your cutting tasks. Avoid distractions and maintain a clear workspace.
- Use the appropriate knife for each task. Different knives are designed for specific purposes, such as slicing, dicing, or chopping.
- Always cut away from your body and keep your fingers curled under to protect them from accidental cuts.
- When not in use, place the knife on a clean surface or in a safe location, away from the edge of the countertop.
- Never catch a falling knife. Let it fall and step back to avoid injury.
D. Knife Safety Tips for Beginners
If you’re new to using knives in the kitchen, here are some helpful tips to ensure your safety:
- Start with a basic knife skills course or watch instructional videos to learn proper cutting techniques.
- Practice proper hand placement and grip on the knife handle.
- Begin with slower, controlled cuts until you feel comfortable with the knife’s movements.
- Focus on maintaining a consistent cutting angle to achieve even slices.
- Always use a cutting board to protect your countertop and provide stability for your cutting motions.
E. Common Knife-Related Injuries and Prevention
Knife-related injuries can occur even with the utmost caution. Here are some common knife-related injuries and how to prevent them:
- Cuts and lacerations: To prevent cuts, always use a sharp knife and maintain proper hand placement while cutting. Avoid rushing or using excessive force.
- Knife slips: Knife slips can happen if the blade is not properly secured on the cutting surface. Ensure your cutting board is stable and use a non-slip mat underneath if needed.
- Burns and scalds: When working with hot ingredients or stovetop cooking, be mindful of the proximity of your knife to heat sources to prevent burns or scalds.
- Knife drops: Accidentally dropping a knife can lead to injuries. Always be aware of your surroundings and handle knives with a secure grip.
By following these knife safety practices, you can minimize the risk of accidents and injuries in the kitchen. Remember, practice makes perfect, and with time, you’ll become more comfortable and confident in your knife skills.
IV. Knife Skills for Precision Cutting
Knife skills are an essential aspect of culinary expertise. Mastering different cutting techniques not only enhances the presentation of your dishes but also ensures even cooking and optimal flavor. In this section, we will explore various slicing, chopping, and dicing techniques that will elevate your culinary skills to new heights.
A. Slicing Techniques
1. Slicing Meat
When it comes to slicing meat, it is crucial to use a sharp knife and ensure that the meat is properly rested before cutting. Start by placing the meat on a cutting board and holding it firmly with one hand. With the other hand, grip the knife and make smooth, even strokes across the grain of the meat. This technique ensures tender slices that are easy to chew.
2. Slicing Fish
Slicing fish requires precision and a delicate touch. Begin by removing the skin and any bones from the fish. Hold the fish firmly with one hand and use a sharp knife to make thin, clean slices at a slight angle. This technique is ideal for creating beautiful sashimi or perfectly cooked fish fillets.
3. Slicing Vegetables
When slicing vegetables, it is important to maintain consistency in thickness to ensure even cooking. Start by selecting fresh vegetables and washing them thoroughly. Hold the vegetable firmly with one hand and use a sharp knife to make smooth, uniform slices. This technique is perfect for creating uniform vegetable medleys or garnishes.
B. Chopping Techniques
1. Chopping Onions
Chopping onions can be a tearful experience, but with the right technique, it can be a breeze. Start by cutting off the ends of the onion and peeling off the outer skin. Cut the onion in half vertically, then make horizontal cuts without cutting through the root end. Finally, make vertical cuts to create evenly sized onion pieces. This technique is essential for adding flavor and texture to various dishes.
2. Chopping Herbs
Chopping herbs requires finesse and precision to preserve their delicate flavors. Begin by washing the herbs and patting them dry. Hold the herbs together tightly and use a sharp knife to make quick, gentle chopping motions. This technique ensures that the herbs are finely chopped without bruising or crushing them.
3. Chopping Garlic
Chopping garlic can be a sticky task, but with the right technique, it becomes effortless. Start by peeling the garlic cloves and removing any green sprouts. Place the flat side of a knife blade on top of a clove and press down firmly to crush it. Then, finely chop the crushed garlic using a rocking motion with the knife. This technique releases the full flavor of the garlic and allows it to infuse into your dishes.
C. Dicing Techniques
1. Dicing Onions
Dicing onions adds texture and flavor to a wide range of dishes. Begin by cutting off the ends of the onion and peeling off the outer skin. Cut the onion in half vertically, then make horizontal cuts without cutting through the root end. Finally, make vertical cuts to create evenly sized onion cubes. This technique is perfect for adding depth to soups, stews, and stir-fries.
2. Dicing Tomatoes
Dicing tomatoes requires a gentle touch to avoid crushing the delicate flesh. Start by washing the tomatoes and removing the core. Cut the tomatoes in half horizontally, then make vertical cuts to create evenly sized tomato cubes. This technique is ideal for adding freshness and color to salads, salsas, and pasta dishes.
3. Dicing Potatoes
Dicing potatoes is a versatile technique that can be used in various dishes, from soups to casseroles. Begin by peeling the potatoes and cutting off the ends. Cut the potatoes into thick slices, then stack the slices and cut them into evenly sized cubes. This technique ensures that the potatoes cook evenly and have a uniform texture.
Mastering knife skills is a journey that requires practice and patience. By honing these slicing, chopping, and dicing techniques, you will elevate your culinary creations and impress your guests with beautifully prepared dishes. Remember, practice makes perfect, so grab your knife and start exploring the world of precision cutting!
V. Knife Skills for Precision Garnishing

When it comes to garnishing, knife skills play a crucial role in achieving precision and creating visually appealing dishes. In this section, we will explore various knife techniques for garnishing, essential tools and accessories, as well as creative ideas to elevate your culinary creations.
A. Knife Techniques for Garnishing
1. Tourne
The tourne technique involves shaping vegetables into small, seven-sided football-like shapes. This technique requires a paring knife with a curved blade and a steady hand. By mastering the tourne technique, you can add an elegant touch to your dishes, especially when garnishing with root vegetables like potatoes and carrots.
2. Château
The château technique is commonly used for garnishing potatoes. It involves cutting the potatoes into rectangular shapes with seven equal sides. This technique requires precision and a sharp knife to achieve consistent results. The château technique is often used in classic French cuisine to create visually appealing potato garnishes.
3. Paysanne
The paysanne technique involves cutting vegetables into small, even-sized squares or rectangles. This technique is versatile and can be used to garnish a variety of dishes, adding both visual appeal and texture. The paysanne technique is commonly used for vegetables like carrots, bell peppers, and zucchini.
4. Tourné
The tourné technique is similar to the tourne technique but involves shaping vegetables into a seven-sided barrel shape. This technique requires precision and practice to achieve consistent results. The tourné technique is often used for garnishing root vegetables like potatoes and turnips, adding an elegant touch to dishes.
B. Garnishing Tools and Accessories
When it comes to precision garnishing, having the right tools and accessories is essential. Here are some must-have items for garnishing:
- Paring Knife: A sharp paring knife with a thin, pointed blade is essential for intricate garnishing work.
- Mandoline Slicer: A mandoline slicer allows for precise and uniform slicing of vegetables, making it easier to create consistent garnishes.
- Decorating Brushes: Decorating brushes are used to apply sauces, oils, or glazes to garnishes, adding an extra layer of flavor and visual appeal.
- Garnishing Tweezers: Garnishing tweezers are handy for precise placement of small garnishes, allowing for intricate designs and arrangements.
- Vegetable Peeler: A vegetable peeler is essential for peeling and shaping vegetables, especially when using the tourne or tourné techniques.
C. Creative Garnishing Ideas
Garnishing is not just about precision and technique; it’s also an opportunity to unleash your creativity and add a unique touch to your dishes. Here are some creative garnishing ideas to inspire you:
- Edible Flowers: Use edible flowers like pansies, violets, or nasturtiums to add a pop of color and delicate flavor to your dishes.
- Herb Sprinkles: Finely chop fresh herbs like parsley, cilantro, or chives and sprinkle them over your dishes for added freshness and flavor.
- Citrus Zest: Use a zester or a fine grater to add citrus zest to your dishes. The vibrant colors and aromatic oils will enhance both the visual and sensory experience.
- Carving Fruits and Vegetables: Take your garnishing skills to the next level by carving intricate designs on fruits and vegetables. Watermelons, pumpkins, and radishes are great options for carving.
- Microgreens: Add a touch of elegance to your dishes with microgreens. These tiny, flavorful greens are packed with nutrients and make for beautiful garnishes.
Remember, garnishing is an art form that allows you to showcase your creativity and attention to detail. Practice different techniques, experiment with flavors and textures, and let your imagination run wild to create stunning garnishes that will impress both visually and gastronomically.
VI. Knife Skills for Precision Carving
When it comes to culinary knife skills, precision carving is an essential technique that every aspiring chef should master. Whether you’re carving meat, fish, or fruits and vegetables, using the right techniques can make a significant difference in the presentation and taste of your dishes. In this section, we will explore the various carving techniques for different types of food.
A. Carving Techniques for Meat
1. Roast Chicken
Carving a roast chicken requires careful precision to ensure that each slice is tender and juicy. Start by placing the chicken on a cutting board and removing the legs and wings. Then, make a horizontal cut along the breastbone to separate the two halves. Finally, slice the breast meat against the grain, creating thin, even slices.
2. Roast Beef
When carving roast beef, it’s important to slice against the grain to ensure tenderness. Begin by placing the roast on a cutting board and removing any excess fat. Then, make thin, even slices across the grain, using a sharp carving knife. This will result in tender, flavorful slices of beef.
3. Roast Turkey
Carving a roast turkey can be a daunting task, but with the right technique, it can be a breeze. Start by removing the legs and wings, then make a horizontal cut along the breastbone to separate the two halves. Next, slice the breast meat against the grain, creating thin, succulent slices. Finally, remove the thighs and drumsticks, and carve them separately.
B. Carving Techniques for Fish
1. Whole Fish
Carving a whole fish requires delicacy and precision. Start by placing the fish on a cutting board and removing the head and tail. Then, make a vertical cut along the spine to separate the two fillets. Next, remove the bones from the fillets using a fish bone tweezer or a pair of pliers. Finally, slice the fillets into portions, ensuring that each piece has a clean, bone-free cut.
2. Fillets
When carving fish fillets, it’s important to use a sharp, flexible knife to ensure clean cuts. Start by placing the fillet on a cutting board, skin-side down. Then, make a diagonal cut at the base of the fillet to remove any excess skin. Next, slice the fillet into portions, making sure to cut against the grain for maximum tenderness.
C. Carving Techniques for Fruits and Vegetables
Carving fruits and vegetables can add an artistic touch to your dishes. Here are a few techniques to get you started:
– Melon Balls: Use a melon baller to scoop out small, round balls from melons. These can be used as garnishes or added to fruit salads.
– Julienne: Julienne is a technique used to create thin, matchstick-like strips of vegetables. Use a sharp knife to cut the vegetables into thin slices, then stack the slices and cut them into thin strips.
– Chiffonade: Chiffonade is a technique used to create thin, ribbon-like strips of leafy greens. Stack the leaves on top of each other, roll them tightly, and slice them thinly.
– Radish Roses: To create radish roses, start by cutting a thin slice off the bottom of the radish to create a stable base. Then, make several vertical cuts around the radish, stopping just before reaching the bottom. Finally, gently fan out the slices to create a beautiful rose shape.
Mastering the art of precision carving can take time and practice, but with the right techniques, you can elevate your culinary skills to new heights. Whether you’re carving meat, fish, or fruits and vegetables, remember to use a sharp knife, maintain a steady hand, and always prioritize safety in the kitchen. Happy carving!
VII. Knife Skills for Precision Filleting
When it comes to culinary knife skills, precision filleting is an essential technique that every aspiring chef should master. Whether you’re working with fish or meat, knowing how to fillet with precision can elevate your cooking to a whole new level. In this section, we will explore the different filleting techniques for fish and meat, including the step-by-step process of filleting a whole fish, preparing fish fillets, and removing fish bones. We will also delve into the filleting techniques for beef, pork, and chicken fillets. So, let’s sharpen our knives and get started!
A. Filleting Techniques for Fish
1. Whole Fish Filleting
Filleting a whole fish may seem daunting at first, but with the right technique, it can be a breeze. Start by placing the fish on a clean cutting board and make a shallow incision behind the gills. Then, insert the knife along the backbone and gently cut through the flesh, following the natural curve of the fish. Use long, smooth strokes to separate the fillet from the bones, keeping the knife close to the bones to minimize waste. Repeat the process on the other side of the fish to obtain two beautiful fillets.
2. Fish Fillet Preparation
Once you have obtained the fish fillets, it’s important to prepare them properly before cooking. Start by removing the skin from the fillets. You can do this by sliding the knife between the flesh and the skin, using a gentle sawing motion. Next, check the fillets for any remaining bones and remove them using tweezers or fish bone pliers. Finally, trim any excess fat or connective tissue from the fillets to ensure a clean and uniform appearance.
3. Removing Fish Bones
Removing fish bones is a crucial step in filleting fish, as it ensures a pleasant dining experience for your guests. To remove the bones, start by placing the fillet skin-side down on the cutting board. Locate the row of pin bones running along the center of the fillet and make a shallow incision on each side of the bones. Then, use a pair of fish bone pliers to grip the bones firmly and gently pull them out in the direction they are pointing. Repeat the process for any remaining bones.
B. Filleting Techniques for Meat
1. Beef Fillet
When it comes to filleting beef, the tenderloin, also known as the beef fillet, is a prized cut that requires precision and skill to extract. Start by trimming any excess fat or silver skin from the beef fillet. Then, make a horizontal incision along the length of the fillet, about a third of the way from the top. Use your free hand to hold the fillet steady while you carefully slide the knife between the meat and the silver skin, separating them with smooth, controlled strokes. Continue to remove the silver skin, working your way down the fillet until it is completely removed.
2. Pork Fillet
Similar to beef filleting, pork filleting involves removing the silver skin from the tenderloin. Begin by trimming any excess fat or connective tissue from the pork fillet. Then, make a small incision at one end of the fillet and gently slide the knife between the meat and the silver skin, using a sawing motion. As you progress, keep the knife at a slight angle to ensure that you remove only the silver skin and not the meat. Continue until the entire silver skin is removed, leaving behind a clean and tender pork fillet.
3. Chicken Fillet
When filleting chicken, the goal is to obtain boneless, skinless chicken breasts. Start by removing the skin from the chicken breast, using a gentle peeling motion. Then, make a horizontal incision along the side of the breast, about halfway through the thickness. Hold the knife parallel to the cutting board and carefully slice through the breast, separating it into two halves. Finally, trim any excess fat or cartilage from the chicken fillets to achieve a clean and uniform appearance.
Mastering the art of precision filleting is a valuable skill that can take your culinary creations to new heights. Whether you’re working with fish or meat, the techniques outlined in this section will help you achieve perfectly filleted ingredients for your dishes. So, grab your knife, practice these techniques, and get ready to impress your guests with your culinary prowess!
VIII. Knife Skills for Precision Peeling and Trimming
When it comes to culinary knife skills, precision is key. Whether you’re peeling fruits and vegetables or trimming meat, having the right techniques can make all the difference in achieving the desired results. In this section, we will explore various peeling and trimming techniques that will help you elevate your culinary game.
A. Peeling Techniques for Fruits and Vegetables
1. Potatoes:
Peeling potatoes may seem like a simple task, but there are a few tips and tricks that can make the process easier and more efficient. Start by selecting a sharp peeler that feels comfortable in your hand. Hold the potato firmly and begin peeling from top to bottom, following the natural contours of the potato. Take care to remove only the skin, leaving behind as much flesh as possible. If you encounter any stubborn spots, gently scrape them away with the edge of the peeler. Rinse the peeled potatoes under cold water to remove any lingering dirt or debris.
2. Apples:
Peeling apples can be a breeze if you know the right technique. Begin by selecting a sharp paring knife or an apple peeler. Hold the apple in one hand and the knife or peeler in the other. Start at the top of the apple and work your way down, following the curve of the fruit. Take care to remove only the skin, leaving behind as much flesh as possible. If you prefer, you can also core the apple before peeling it. Once peeled, rinse the apple under cold water to remove any residue.
3. Carrots:
Peeling carrots is a skill that can come in handy in many recipes. To peel a carrot, start by selecting a sharp peeler or a paring knife. Hold the carrot firmly in one hand and the peeler or knife in the other. Begin peeling from the top of the carrot, working your way down. Take care to remove only the outer layer, leaving behind as much of the carrot as possible. If there are any blemishes or tough spots, gently scrape them away with the edge of the peeler or knife. Rinse the peeled carrot under cold water to remove any dirt or debris.
B. Trimming Techniques for Meat
1. Removing Fat:
Trimming fat from meat is an important step in many recipes, as it helps improve the flavor and texture of the final dish. To trim fat from meat, start by selecting a sharp boning knife or a chef’s knife. Hold the meat firmly with one hand and the knife in the other. Carefully slide the knife between the fat and the meat, using a gentle sawing motion to separate the two. Take care to remove only the excess fat, leaving behind as much lean meat as possible. If there are any tough or gristly parts, trim them away as well. Rinse the trimmed meat under cold water to remove any loose fat or debris.
2. Trimming Silverskin:
Silverskin is a thin, tough membrane that can be found on certain cuts of meat. It is important to remove silverskin before cooking, as it can become tough and chewy when cooked. To trim silverskin, start by selecting a sharp boning knife or a paring knife. Hold the meat firmly with one hand and the knife in the other. Carefully slide the knife between the silverskin and the meat, using a gentle sawing motion to separate the two. Take care to remove only the silverskin, leaving behind as much of the meat as possible. Rinse the trimmed meat under cold water to remove any residue.
Mastering knife skills for precision peeling and trimming is a valuable asset in the culinary world. By following these techniques, you can ensure that your fruits, vegetables, and meats are prepared with the utmost precision and care. So grab your knives and start practicing!

William Black is a seasoned wordsmith with a passion for crafting compelling content. Hailing from the vibrant city of Seattle, he has honed his writing skills through years of experience in the field. William holds a Bachelor’s degree in English Literature from the prestigious University of Washington, where he developed a deep appreciation for the power of storytelling. His educational background has equipped him with a keen eye for detail and a strong command of the English language. With a particular expertise in SEO writing, William effortlessly weaves keywords into his prose, ensuring maximum visibility and engagement. When he’s not busy crafting captivating content, you can find William exploring the local food scene, indulging in his love for all things culinary.