Contents
- I. Introduction
- II. Canning
- III. Freezing
- IV. Drying
- V. Comparison of Canning, Freezing, and Drying
- VI. Safety Considerations
- VII. Tips for Successful Food Preservation
- VIII. Frequently Asked Questions (FAQs)
- 1. Can I reuse canning jars and lids?
- 2. How long can canned food be stored?
- 3. Can all types of food be frozen?
- 4. How long does frozen food last?
- 5. Can I freeze food in any type of container?
- 6. What foods are suitable for drying?
- 7. How do I know if dried food is properly dehydrated?
- 8. Can dried food be rehydrated?
- 9. Are there any food safety concerns with preserved food?
- 10. Can I preserve food without using any equipment?
I. Introduction
Welcome to the world of food preservation techniques! In this article, we will explore the three most popular methods of preserving food: canning, freezing, and drying. These techniques have been used for centuries to extend the shelf life of perishable foods, ensuring that we can enjoy them long after their harvest season.
Food preservation is not only a practical way to reduce waste and save money, but it also allows us to savor the flavors of our favorite fruits, vegetables, and meats all year round. Whether you are a seasoned home cook or a beginner in the kitchen, learning these preservation techniques will open up a world of culinary possibilities.
In the following sections, we will delve into each method in detail, discussing the equipment needed, step-by-step instructions, and tips for success. We will also highlight the advantages and disadvantages of each technique, helping you choose the best method for your specific needs.
So, whether you want to savor the taste of summer peaches during the winter months, stock up on garden-fresh produce, or simply reduce food waste, this article will serve as your comprehensive guide to food preservation. Get ready to embark on a journey of flavors and discover the art of preserving food!
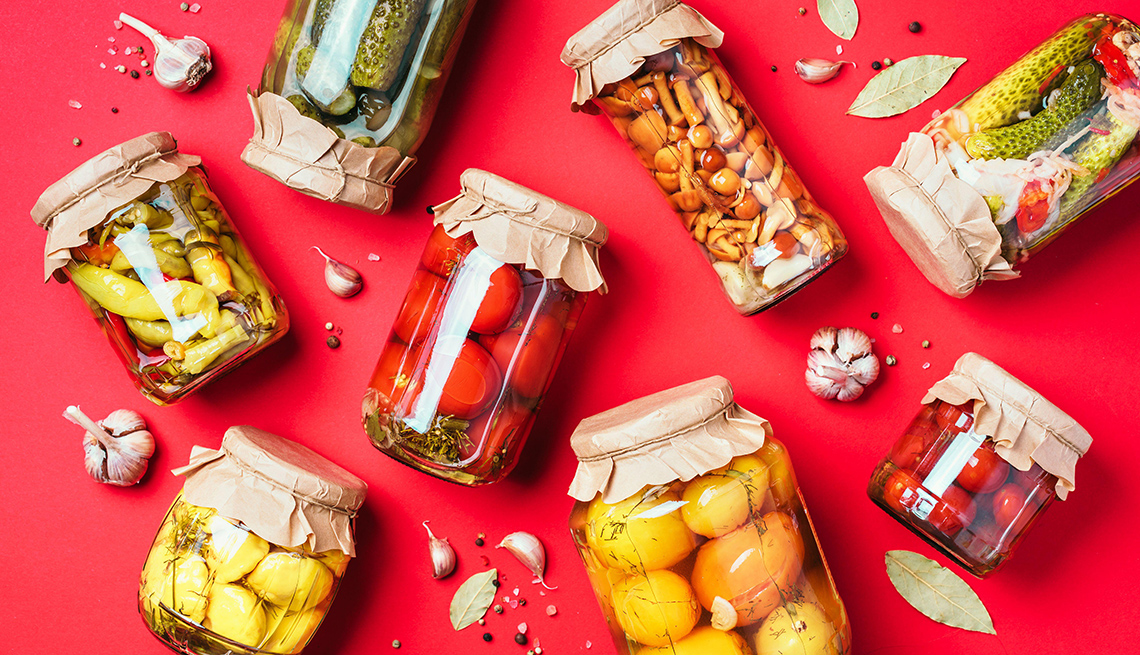
II. Canning

In this section, we will explore the art of canning and how it can be used as an effective food preservation technique. Canning is a process that involves sealing food in airtight containers, such as jars, to prevent spoilage and extend its shelf life. It is an excellent way to preserve fruits, vegetables, and even meats for long periods.
A. What is canning?
Canning is a method of preserving food that has been practiced for centuries. It involves placing food in jars or cans and heating them to a temperature that kills bacteria, yeasts, and molds, thereby preventing spoilage. The heat also creates a vacuum seal, which further helps in preserving the food.
There are two main types of canning: water bath canning and pressure canning. Water bath canning is suitable for high-acid foods, such as fruits, pickles, and jams, while pressure canning is necessary for low-acid foods, such as vegetables, meats, and seafood.
B. Equipment needed for canning
Before you start canning, it is essential to gather the necessary equipment. Here are some items you will need:
- Jars: Choose jars specifically designed for canning, such as Mason jars. Ensure they are free from cracks or chips.
- Lids and bands: Use new lids for each canning session to ensure a proper seal. Bands can be reused as long as they are in good condition.
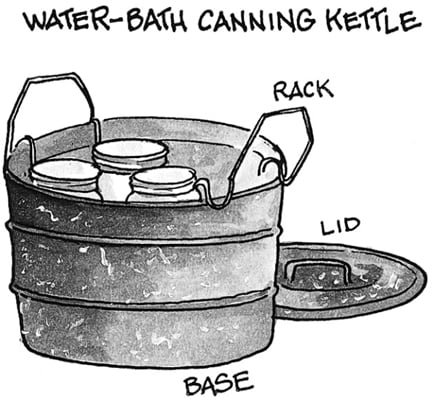
- Canning pot: A large pot with a rack is required for water bath canning. For pressure canning, a pressure canner is necessary.
- Canning tools: These include a jar lifter, lid lifter, funnel, and bubble remover/headspace tool.
- Other supplies: You may also need a ladle, measuring cups, towels, and a timer.
C. Step-by-step guide to canning
Now let’s walk through the canning process step by step:
- Preparing the jars and lids: Wash the jars, lids, and bands in hot, soapy water. Rinse them thoroughly and place them in a pot of simmering water to keep them hot until ready to use.
- Preparing the food for canning: Wash and prepare the food according to the recipe. Cut fruits and vegetables into appropriate sizes.
- Filling and sealing the jars: Use a funnel to fill the jars with the prepared food, leaving the recommended headspace. Wipe the jar rims clean, place the lids on top, and screw the bands on until fingertip tight.
- Processing the jars: Place the filled jars in a canning pot or pressure canner, ensuring they are covered with at least 1-2 inches of water. Follow the recommended processing time and temperature for the specific food you are canning.
- Storing and using canned food: Once the jars are processed, carefully remove them from the canner and place them on a towel-lined countertop. Let them cool undisturbed for 12-24 hours. Check the seals, remove the bands, and store the jars in a cool, dark place. Use the canned food within the recommended time frame.
D. Pros and cons of canning
Like any food preservation method, canning has its advantages and disadvantages. Let’s take a look at some of them:
| Pros | Cons |
|---|---|
| – Extends shelf life of food | – Requires time and effort |
| – Preserves nutrients | – Initial investment in equipment |
| – Allows for year-round availability of seasonal produce | – Limited storage space |
| – Offers control over ingredients and additives | – Risk of spoilage if not done correctly |
E. Best canning practices
To ensure successful canning, here are some best practices to keep in mind:
- Follow tested and approved recipes from reliable sources.
- Use fresh, high-quality ingredients.
- Properly sanitize jars, lids, and equipment before use.
- Adhere to recommended headspace and processing times.
- Store canned food in a cool, dark place and check for signs of spoilage before consuming.
- Regularly inspect jars for any signs of damage or bulging lids.
By following these guidelines, you can safely and effectively preserve your favorite foods through canning.
III. Freezing
A. What is freezing?
Freezing is a popular food preservation technique that involves lowering the temperature of food to below its freezing point, typically to around 0°F (-18°C). This process helps to slow down the growth of bacteria, yeast, and mold, which can cause food spoilage. By freezing food, you can extend its shelf life and maintain its quality for a longer period of time.
B. Equipment needed for freezing
Before you start freezing your food, it’s important to have the right equipment on hand. Here are some essential tools you’ll need:
- Airtight containers or freezer bags: These will help protect your food from freezer burn and prevent moisture loss.
- Freezer-safe glass or plastic containers: These are ideal for storing liquids or soups.
- Aluminum foil or freezer paper: These can be used to wrap individual portions of food.
- Labels and markers: These will help you keep track of the contents and date of freezing.
- Freezer thermometer: This will help you monitor the temperature of your freezer to ensure it stays at 0°F (-18°C) or below.
C. Step-by-step guide to freezing
1. Preparing the food for freezing
Properly preparing your food before freezing is crucial to maintain its quality. Here’s how you can do it:
- Wash and peel fruits and vegetables, removing any bruised or damaged parts.
- Cut food into appropriate sizes for freezing. For example, slice fruits or chop vegetables into bite-sized pieces.
- Blanch vegetables by briefly boiling them in water and then plunging them into ice water to stop the cooking process. This helps preserve their color, texture, and nutrients.
- For meats, trim off excess fat and divide them into portions suitable for your needs.
2. Packaging and labeling the food
Once your food is prepared, it’s time to package and label it properly. Follow these steps:
- Use airtight containers or freezer bags to prevent air and moisture from entering.
- Remove as much air as possible from the containers or bags before sealing them.
- Label each container or bag with the name of the food and the date of freezing.
3. Freezing the food
Now that your food is properly packaged, it’s time to freeze it. Here’s what you need to do:
- Place the packaged food in the coldest part of your freezer.
- Avoid overcrowding the freezer to allow for proper air circulation.
- Keep the temperature of your freezer at 0°F (-18°C) or below.
4. Storing and using frozen food
Once your food is frozen, it’s important to store it properly and use it within a reasonable time frame. Follow these guidelines:
- Organize your freezer by grouping similar foods together.
- Keep an inventory of the frozen foods and their expiration dates.
- Thaw frozen food in the refrigerator or using the defrost setting on your microwave.
- Consume thawed food within 24 to 48 hours to ensure its safety and quality.
D. Pros and cons of freezing
Freezing food offers several advantages, but it also has its drawbacks. Here are some pros and cons to consider:
| Pros | Cons |
|---|---|
| – Extends the shelf life of food | – Some foods may lose texture or flavor after freezing |
| – Retains the nutritional value of food | – Freezer burn can occur if food is not properly packaged |
| – Allows for bulk cooking and meal prepping | – Limited storage space in the freezer |
| – Reduces food waste | – Certain foods may not freeze well |
E. Best freezing practices
To ensure the best results when freezing your food, here are some tips to keep in mind:
- Choose high-quality, fresh ingredients for freezing.
- Package your food in appropriate portion sizes to minimize waste.
- Label your frozen food with the name and date of freezing for easy identification.
- Make sure your freezer is set at the correct temperature and is well-organized.
- Follow recommended thawing methods to maintain the quality and safety of your food.
By following these guidelines, you can effectively freeze your food and enjoy its freshness and flavor even after an extended period of time. Freezing is a convenient and practical way to preserve a wide variety of foods, allowing you to enjoy seasonal produce all year round and reduce food waste. So go ahead and start freezing your favorite ingredients today!
IV. Drying

Drying is a popular method of food preservation that involves removing moisture from food to prevent spoilage. It is a simple and effective way to extend the shelf life of various foods, including fruits, vegetables, herbs, and meats. In this section, we will explore what drying is, the equipment needed for drying, a step-by-step guide to drying, the pros and cons of drying, and best drying practices.
A. What is drying?
Drying is the process of removing moisture from food, which inhibits the growth of bacteria, yeast, and molds that cause spoilage. By reducing the water content, drying slows down the enzymatic reactions that lead to spoilage and preserves the nutritional value of the food. Dried foods are lightweight, compact, and have a longer shelf life compared to fresh foods.
B. Equipment needed for drying
To successfully dry food, you will need the following equipment:
- Dehydrator: A dehydrator is a device that uses low heat and airflow to remove moisture from food. It typically consists of trays or racks for placing the food and a fan for circulating the air.
- Oven: If you don’t have a dehydrator, you can use your oven to dry food. Set the oven to the lowest temperature and place the food on a baking sheet lined with parchment paper.
- Sun: Drying food in the sun is a traditional method that requires no special equipment. However, it is weather-dependent and may take longer compared to using a dehydrator or oven.
- Knife and cutting board: You will need a knife and cutting board to prepare the food for drying. Slice the food into thin, uniform pieces to ensure even drying.
- Storage containers: Once the food is dried, you will need airtight containers or resealable bags to store it.
C. Step-by-step guide to drying
Follow these steps to dry food effectively:
- Preparing the food for drying: Wash and peel the fruits or vegetables. Remove any seeds, stems, or unwanted parts. Slice the food into thin, uniform pieces to ensure even drying.
- Choosing a drying method: Decide whether you will use a dehydrator, oven, or sun drying method based on your available resources and the type of food you are drying.
- Drying the food: Arrange the food in a single layer on the dehydrator trays or baking sheets. If using a dehydrator, set the temperature according to the food being dried. If using an oven, set it to the lowest temperature and leave the door slightly ajar for air circulation. If sun drying, place the food on a clean, dry surface in direct sunlight.
- Storing and using dried food: Once the food is fully dried, let it cool completely before storing it in airtight containers or resealable bags. Store the dried food in a cool, dark place to maintain its quality. To use the dried food, rehydrate it by soaking it in water or adding it directly to soups, stews, or other recipes.
D. Pros and cons of drying
Drying food offers several advantages and disadvantages:
| Pros | Cons |
|---|---|
|
|
E. Best drying practices
Follow these best practices to ensure successful drying:
- Choose fresh, ripe, and high-quality produce for drying.
- Slice the food into uniform pieces to ensure even drying.
- Pre-treat fruits prone to browning with lemon juice or ascorbic acid to maintain their color.
- Rotate the trays or pans during the drying process for uniform drying.
- Monitor the drying progress regularly to prevent over-drying or under-drying.
- Store the dried food in airtight containers or resealable bags to maintain its quality.
- Label the containers with the name and date of drying for easy identification.
Drying is a versatile and practical method of food preservation that allows you to enjoy the flavors and nutrition of various foods throughout the year. By following the step-by-step guide and best practices outlined in this section, you can confidently dry your favorite fruits, vegetables, and herbs, and enjoy their benefits for months to come.
V. Comparison of Canning, Freezing, and Drying
When it comes to preserving food, there are several methods to choose from. Canning, freezing, and drying are three popular techniques that offer different benefits and considerations. In this section, we will compare these methods in terms of shelf life, nutritional value, taste and texture, as well as convenience and accessibility.
A. Shelf life comparison
Shelf life is an important factor to consider when choosing a food preservation method. Canning, which involves sealing food in airtight containers, can provide a long shelf life of up to one to five years, depending on the type of food and the storage conditions. This makes it a great option for long-term preservation.
Freezing, on the other hand, can extend the shelf life of food for several months to a year. By storing food at temperatures below 0°F (-18°C), the growth of bacteria and other microorganisms is significantly slowed down. However, it’s important to note that the quality of frozen food may deteriorate over time.
Drying, also known as dehydration, removes moisture from food, which inhibits the growth of bacteria and other spoilage organisms. This method can provide a shelf life of several months to a year, depending on the type of food and the storage conditions. However, some foods may lose their flavor and texture when dried.
B. Nutritional value comparison
Preserving the nutritional value of food is crucial to maintaining a healthy diet. Canning, freezing, and drying all have different effects on the nutritional content of food.
Canning involves heating food to high temperatures, which can cause some loss of heat-sensitive nutrients such as vitamin C and B vitamins. However, other nutrients like fiber and minerals are generally well-preserved. It’s important to note that the nutritional value of canned food can also depend on the quality and freshness of the ingredients used.
Freezing is considered one of the best methods for preserving the nutritional value of food. The quick freezing process helps retain most of the nutrients, including vitamins and minerals. However, some vegetables may experience a slight loss in texture and flavor after thawing.
Drying can cause some loss of nutrients, especially heat-sensitive vitamins. However, dried foods can still be a good source of fiber, minerals, and antioxidants. It’s worth noting that the nutritional content of dried food can vary depending on the drying method used.
C. Taste and texture comparison
The taste and texture of preserved food are important factors that can influence our enjoyment of meals. Let’s compare how canning, freezing, and drying affect the taste and texture of food.
Canned food often retains its original taste and texture, especially when high-quality ingredients are used. However, some foods may become softer or mushier during the canning process. Additionally, the flavors of different ingredients can blend together, creating unique and delicious combinations.
Frozen food can maintain its taste and texture quite well, especially when properly packaged and stored. However, some vegetables may become slightly mushy after thawing, and the texture of certain fruits may change. It’s important to follow proper freezing and thawing techniques to minimize any negative effects on taste and texture.
Dried food can have a concentrated flavor and a chewy or crispy texture, depending on the type of food. The drying process can intensify the natural flavors of fruits and vegetables, making them a tasty and convenient snack. However, some foods may become tough or leathery when dried, which can affect their overall enjoyment.
D. Convenience and accessibility comparison
Convenience and accessibility are important considerations when choosing a food preservation method. Let’s compare canning, freezing, and drying in terms of these factors.
Canning can be a time-consuming process that requires careful preparation and sterilization of equipment. It may also require specialized tools, such as pressure canners for low-acid foods. However, once the food is canned, it can be easily stored and accessed without the need for refrigeration or freezing.
Freezing is a relatively simple and convenient method. It requires minimal preparation and equipment, such as freezer-safe containers or bags. Frozen food can be easily stored and accessed, but it does require freezer space and continuous electricity supply to maintain the freezing temperatures.
Drying food can be a convenient method, especially for lightweight and portable snacks. It requires minimal storage space and can be easily carried on outdoor adventures or during travel. However, the drying process can take time, and some foods may require additional steps, such as blanching or pretreatment.
In terms of accessibility, canned food can be found in most grocery stores and is readily available for purchase. Frozen food is also widely available, but it requires access to a freezer for storage. Dried food can be purchased from stores or made at home, offering flexibility and control over the ingredients used.
VI. Safety Considerations
A. General food safety guidelines
When it comes to food preservation techniques such as canning, freezing, and drying, ensuring safety is of utmost importance. By following general food safety guidelines, you can minimize the risk of foodborne illnesses and ensure that your preserved foods remain safe to consume.
First and foremost, it is crucial to start with fresh and high-quality ingredients. Using fruits, vegetables, and meats that are in good condition and free from any signs of spoilage is essential for safe preservation. Inspect the produce carefully, discarding any items that show signs of mold, rot, or damage.
Thoroughly wash all fruits and vegetables before preserving them. This helps remove any dirt, bacteria, or pesticides that may be present on the surface. Use clean water and a vegetable brush to scrub the produce gently. For meats, ensure that they are properly trimmed and cleaned to eliminate any potential sources of contamination.
Proper hygiene practices are crucial during the preservation process. Wash your hands thoroughly with soap and water before handling any food items. Clean and sanitize all utensils, containers, and equipment that will come into contact with the food. This includes knives, cutting boards, canning jars, and drying racks.
Follow the recommended processing times and temperatures for each preservation method. Canning, freezing, and drying all have specific guidelines that need to be followed to ensure the destruction of harmful bacteria and the preservation of food quality. Use reliable and up-to-date resources, such as reputable canning guides or food preservation books, to determine the appropriate processing times and temperatures for different foods.
Lastly, proper storage is essential to maintain the safety of preserved foods. Canned goods should be stored in a cool, dark place, away from direct sunlight and extreme temperatures. Frozen foods should be kept at a constant temperature of 0°F (-18°C) or below. Dried foods should be stored in airtight containers in a cool, dry place.
B. Specific safety considerations for canning
Canning is a popular food preservation method that involves sealing food in jars and heating them to destroy bacteria and other microorganisms. While canning is an effective way to preserve food, it is important to be aware of specific safety considerations to ensure the safety of the final product.
One of the key safety considerations in canning is the use of proper canning jars and lids. Choose jars specifically designed for canning, as they are made to withstand the high temperatures and pressures involved in the process. Inspect the jars for any cracks or chips before use, as these can compromise the seal and lead to spoilage.
When it comes to lids, always use new lids for each canning session. The rubber seal on the lids is essential for creating an airtight seal, and reusing old lids can result in a faulty seal and potential contamination. Follow the manufacturer’s instructions for preparing the lids, including preheating them before use.
Proper heat processing is crucial in canning to destroy any harmful bacteria or microorganisms. Follow the recommended processing times and temperatures for the specific food being canned. This information can be found in reliable canning guides or resources provided by reputable organizations such as the National Center for Home Food Preservation.
After the jars have been processed and cooled, it is important to check the seals to ensure they are intact. Press down on the center of the lid to check for any movement or give. If the lid pops back, the jar did not seal properly and should be refrigerated or reprocessed. Properly sealed jars can be stored in a cool, dark place for long-term storage.
C. Specific safety considerations for freezing
Freezing is a popular method for preserving a wide variety of foods, including fruits, vegetables, meats, and prepared meals. While freezing is a relatively simple preservation technique, there are specific safety considerations that need to be taken into account to ensure the quality and safety of the frozen foods.
First and foremost, it is important to freeze foods at their peak freshness. This means selecting fruits and vegetables that are fully ripe and in good condition. Freezing will not improve the quality of the food, so it is essential to start with high-quality ingredients.
Proper packaging is crucial in freezing to prevent freezer burn and maintain the quality of the food. Use airtight containers or freezer bags specifically designed for freezing. Remove as much air as possible from the packaging to minimize the risk of freezer burn. Label each package with the contents and date of freezing for easy identification.
When it comes to freezing prepared meals or leftovers, it is important to cool them quickly before placing them in the freezer. Divide large portions into smaller, shallow containers to facilitate faster cooling. This helps prevent the growth of bacteria and ensures that the food freezes quickly and evenly.
Proper storage temperature is essential to maintain the safety and quality of frozen foods. Keep the freezer temperature at 0°F (-18°C) or below to ensure that the food remains frozen solid. Regularly check the temperature using a freezer thermometer to ensure it is within the safe range.
D. Specific safety considerations for drying
Drying is a traditional method of food preservation that involves removing moisture from food to inhibit the growth of bacteria, yeast, and molds. While drying is a relatively safe preservation method, there are specific safety considerations that need to be taken into account to ensure the safety and quality of the dried foods.
Proper preparation is crucial in drying foods safely. Start with fresh and high-quality ingredients, and thoroughly wash and sanitize them before drying. Remove any bruised or damaged parts, as they can harbor bacteria and spoil the final product.
When it comes to drying methods, there are several options to choose from, including air drying, sun drying, and using a food dehydrator. Regardless of the method chosen, it is important to ensure that the food reaches a sufficiently high temperature to kill any bacteria or microorganisms. Follow the recommended drying times and temperatures for different foods to ensure their safety.
Proper storage is essential to maintain the safety and quality of dried foods. Store the dried foods in airtight containers in a cool, dry place away from direct sunlight and moisture. Check the dried foods regularly for any signs of mold, spoilage, or insect infestation. Discard any items that show signs of deterioration.
It is also important to note that dried foods may require rehydration before consumption. Follow the recommended rehydration methods and guidelines for specific dried foods to ensure their safety and palatability.
VII. Tips for Successful Food Preservation
When it comes to food preservation, there are several important factors to consider in order to ensure the best results. Proper food selection, correct preparation techniques, storage tips for preserved food, and labeling and organization tips all play a crucial role in successful food preservation. In this section, we will delve into each of these aspects and provide valuable insights and tips to help you preserve your food effectively.
A. Proper food selection
Choosing the right food for preservation is essential to maintain its quality and safety. Here are some tips to help you make the best food selection:
- Opt for fresh, high-quality produce: Select fruits and vegetables that are ripe but not overripe. Avoid using bruised or damaged produce as it may affect the overall quality of the preserved food.
- Consider the ripeness stage: Different fruits and vegetables have different ripeness stages that are ideal for preservation. For example, tomatoes are best preserved when they are fully ripe, while green beans are better preserved when they are still slightly immature.
- Choose the right cuts: When preserving meat or poultry, choose cuts that are suitable for the preservation method you plan to use. For example, boneless cuts are easier to can or freeze, while bone-in cuts may require additional preparation.
- Take into account the acidity level: Acidic foods, such as tomatoes and citrus fruits, are better suited for canning, while low-acid foods, such as meats and vegetables, require pressure canning to ensure safety.
B. Correct preparation techniques
Proper preparation techniques are crucial to ensure the safety and quality of preserved food. Follow these tips to prepare your food correctly:
- Wash and sanitize: Thoroughly wash fruits, vegetables, and herbs before preserving them. Use a food-safe sanitizer to sanitize your equipment and utensils to prevent contamination.
- Blanching for vegetables: Blanching is a process that involves briefly boiling vegetables before preserving them. It helps to maintain the color, texture, and nutritional value of the vegetables.
- Peeling and pitting: Some fruits, such as peaches and tomatoes, may require peeling and pitting before preservation. This step helps to remove any tough skins or pits that can affect the quality of the preserved fruit.
- Trimming and deboning: When preserving meat or poultry, trim off excess fat and remove any bones to ensure even cooking and better preservation.
- Follow recipe instructions: When using specific preservation recipes, carefully follow the instructions provided to ensure the correct preparation techniques are followed.
C. Storage tips for preserved food
Proper storage is essential to maintain the quality and safety of preserved food. Here are some tips to help you store your preserved food effectively:
- Choose the right containers: Use food-grade containers that are specifically designed for the preservation method you are using. Mason jars are commonly used for canning, while freezer-safe bags or containers are ideal for freezing.
- Leave appropriate headspace: When canning or freezing, leave the recommended headspace to allow for expansion during freezing or processing.
- Label and date: Properly label each container with the contents and the date of preservation. This will help you keep track of the freshness and ensure you use the oldest preserved food first.
- Store in a cool, dark place: For canned foods, store them in a cool, dark place, such as a pantry or cellar, away from direct sunlight. Frozen foods should be stored in a freezer at 0°F (-18°C) or below.
- Rotate your stock: To ensure the best quality, consume your preserved food within the recommended time frame. Rotate your stock by using the oldest preserved food first.
D. Labeling and organization tips
Proper labeling and organization are essential for easy identification and efficient use of your preserved food. Consider the following tips:
- Use clear and concise labels: Clearly label each container with the contents and the date of preservation. If using specific recipes, include any additional information, such as spices or herbs used.
- Organize by type and date: Group similar preserved foods together and organize them by type and date. This will make it easier to locate specific items and ensure you use the oldest ones first.
- Create an inventory list: Keep track of your preserved food by creating an inventory list. Note down the contents, quantities, and dates of preservation. This will help you plan meals and restock when needed.
- Consider storage solutions: Invest in storage solutions, such as shelves, racks, or bins, to keep your preserved food organized and easily accessible.
By following these tips for successful food preservation, you can ensure that your preserved food remains safe, flavorful, and of high quality. Whether you are canning, freezing, or drying, proper food selection, correct preparation techniques, storage tips, and labeling and organization are key to a successful preservation process.
VIII. Frequently Asked Questions (FAQs)
1. Can I reuse canning jars and lids?
Yes, you can reuse canning jars and lids, but with some precautions. It is important to inspect the jars and lids for any signs of damage, such as cracks or rust. If the jars and lids are in good condition, you can reuse them for canning. However, it is recommended to use new lids for each canning session to ensure a proper seal. The jars should be thoroughly cleaned and sterilized before reuse to prevent any contamination.
2. How long can canned food be stored?
Canned food can be stored for a long time if properly sealed and stored in a cool, dark place. The shelf life of canned food varies depending on the type of food and the storage conditions. Generally, high-acid foods like tomatoes and fruits can be stored for 12 to 18 months, while low-acid foods like meat and vegetables can be stored for 2 to 5 years. It is important to check the expiration dates and discard any cans that show signs of spoilage or damage.
3. Can all types of food be frozen?
Not all types of food can be frozen successfully. Some foods, like lettuce and cucumbers, have a high water content and tend to become mushy when frozen. Other foods, like eggs in their shells and canned foods, should not be frozen due to the risk of explosion. However, most fruits, vegetables, meats, and dairy products can be safely frozen. It is important to properly package the food to prevent freezer burn and maintain its quality.
4. How long does frozen food last?
The storage time for frozen food depends on the type of food and the storage conditions. Generally, frozen fruits and vegetables can be stored for 8 to 12 months, while raw meats and poultry can be stored for 6 to 12 months. Cooked leftovers can be stored for 2 to 3 months. It is important to label the frozen food with the date of freezing and use airtight containers or freezer bags to maintain the quality and prevent freezer burn.
5. Can I freeze food in any type of container?
No, not all containers are suitable for freezing food. It is important to use containers that are specifically designed for freezer storage, such as freezer bags or airtight containers. These containers are made of materials that can withstand low temperatures without cracking or breaking. Avoid using glass jars or containers with metal lids, as they may shatter or rust in the freezer. It is also important to leave enough headspace in the container to allow for expansion of the food as it freezes.
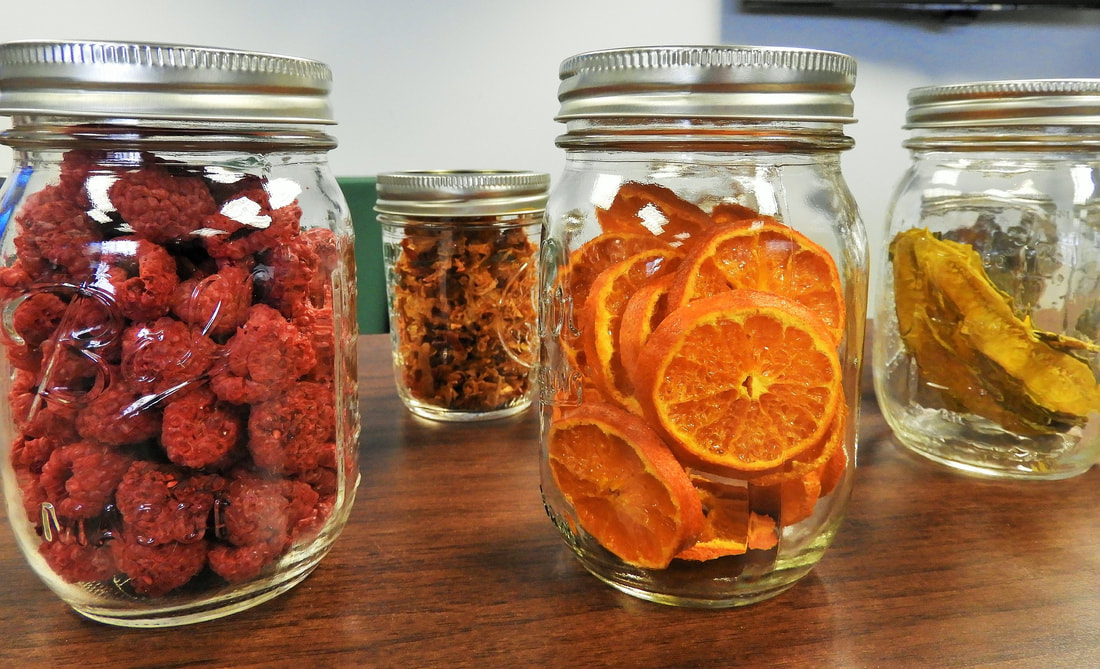
6. What foods are suitable for drying?
Many types of foods can be dried for long-term storage. Fruits like apples, bananas, and berries can be sliced and dried to make delicious snacks. Vegetables like tomatoes, peppers, and mushrooms can be dried and used in soups and stews. Herbs and spices can also be dried to preserve their flavors. Meat and fish can be dried to make jerky. It is important to properly prepare the food before drying and store it in airtight containers to prevent moisture absorption.
7. How do I know if dried food is properly dehydrated?
To ensure that dried food is properly dehydrated, it should be crispy and brittle. When you touch the dried food, it should not feel soft or moist. Fruits and vegetables should be leathery and pliable, but not sticky. Meat and fish should be firm and dry, with no signs of moisture. It is important to follow the recommended drying times and temperatures for different types of food to achieve the desired results.
8. Can dried food be rehydrated?
Yes, dried food can be rehydrated by soaking it in water or other liquids. Fruits and vegetables can be rehydrated by soaking them in water for a few hours or overnight. Meat and fish can be rehydrated by simmering them in liquid until they become tender. It is important to use enough liquid to fully cover the dried food and allow it to absorb the moisture. The rehydrated food can then be used in recipes or eaten as is.
9. Are there any food safety concerns with preserved food?
When preserving food, it is important to follow proper food safety practices to prevent the growth of harmful bacteria or other pathogens. This includes using clean utensils and equipment, washing hands thoroughly, and properly sterilizing jars and lids. It is also important to use tested and approved recipes for canning, freezing, and drying to ensure that the food is preserved safely. If there are any signs of spoilage or contamination, the preserved food should be discarded.
10. Can I preserve food without using any equipment?
Yes, there are methods of preserving food that do not require specialized equipment. For example, you can make refrigerator pickles by simply soaking vegetables in a vinegar solution and storing them in the refrigerator. Freezing is another simple method of preserving food without any special equipment. You can also dry herbs by hanging them in a well-ventilated area. While these methods may not provide as long-term storage as canning or freezing, they can still help extend the shelf life of certain foods.
William Black is a seasoned wordsmith with a passion for crafting compelling content. Hailing from the vibrant city of Seattle, he has honed his writing skills through years of experience in the field. William holds a Bachelor’s degree in English Literature from the prestigious University of Washington, where he developed a deep appreciation for the power of storytelling. His educational background has equipped him with a keen eye for detail and a strong command of the English language. With a particular expertise in SEO writing, William effortlessly weaves keywords into his prose, ensuring maximum visibility and engagement. When he’s not busy crafting captivating content, you can find William exploring the local food scene, indulging in his love for all things culinary.